Showing posts with label DIY. Show all posts

Sunday, February 27, 2022

DIY - condo style

Living in a condo has greatly scaled down my DIY projects. That was intentional. So this project is small but one I've had on the short list for a while.

In my kitchen, there is only one lower cabinet other than under the sink area. It was sort of setup for pots and pans but wasn't very efficient or convenient for holding them or getting them in and out.

Of course, the solution was found on Amazon: a two-level pullout shelf system. It arrived in less than a week.

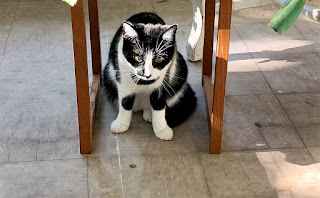
This photo is the before with my trusty assistant who appears to be laying down on the job. Maggie was super good at blocking any of the work that had to happen inside the cabinet :-)


The parts

The instructions said to be sure to align the center of the template to the center of the cabinet. The problem was that the template didn't have a center line.

I can measure and I can do math but it would have been way more simple if the template had a center line.

The other hiccup was the base (the part with the sliders) also did not have a center line. Measuring inside the cabinet was not simple.


As you can see, I did get everything assembled and working. Now the pots, pans and even lids are easy to reach.

My assistant ended up in her house while papa used the drill.

Tuesday, October 6, 2020

Front Porch Project

 Going to start with the after photo because I don't have a good before and the before was hideous.

I haven't ever really used by front porch for a couple of reasons. My house sits at the front of the property so my porch is very close to the sidewalk and the street. It seems odd and uncomfortable for some reason being so close to the sidewalk. But mostly the porch has been kind of skanky. The floor was awful and it just felt abandoned -- because it was.

Spending the Spring, Summer and now Fall in the house, I decided to spruce the front porch up. I got vinyl plank flooring at Menards way back in the early summer. It was either too hot and humid, raining or I was too tired to work on it.

Finally when it cooled down in the late summer I got at it. Once I really started work on the project, it went fairly quickly.

The old floor was a linoleum tile squares. A few were completely loose but most took some effort to get up. Once I came up with a technique, it went fairly smoothly though I did get a nice stigmata like blister in the palm of my right hand.

The biggest decision was which direction to lay the flooring in. I did some research and decided that having the planks "guide" toward the entry was the way to go. Once that was decided, laying the vinyl plank flooring was not bad. However, I can't tell you how many times I cut the wrong end of a plank but that just became the next row.

I re-used the quarter round after repainting white. I added a piece of furniture that Kelly gave me - I think I'll white-wash it so it is beachier - and added a lamp. I already had the two-seater.

I super pleased with the end results and feel like I could actually sit out here and enjoy.

After with staged furniture

After with planks drawing you to the front entrance

In progress. Once I got around that corner, it went quickly

All the nasty linoleum gone

Maggie on the nasty linoleum. My only before photo.

Monday, December 11, 2017

Wrapping Paper Gift Bags

Saw a video on YouTube on wrapping (link here). It included ideas for wrapping odd-shaped items. One of the ideas was to make gift bags out of wrapping paper. I found the instructions on WikiHow (link here).

I made a couple of modifications. Instead of folding down the "top" just once, I did it twice so that it created a thicker band for the handle holes.


Secondly I made the handles by just tying the raffia into a loop. This actually closes the bag pretty well.

Did most of these while I was on hold with Hennepin Department of Health and Human Services. It was actually very fun. These all came out to be about the same size but the nice thing is you can make them any size you want.

Friday, December 8, 2017

Home improvement project - sun room

I planned on painting the sun room quite a while ago based on the date of the paint I bought for the project. It is a dreaded painting project because it is almost all window and door trim. I also had to repair a bit of water damage on the ceiling.


Also, the base-board radiators are a problem because one had to be removed which exposes the pipe and another section also has an exposed pipe without a cover leaving the plaster wall exposed. It probably isn't possible to repair the plaster behind the radiators. So my solution was to try to make them go away.
Corner before

Corner in progress

Corner complete


Friday, October 13, 2017

Door Knobs and Mechanisms

Apparently brass door mechanisms last a bit over 100 years. Several months ago the door mechanism to my bedroom closet exploded. There were several pieces inside and out that fell apart.

And just a couple of weeks ago the inside front door made a snapping sound and would only work being turned one way. I took the mechanism apart to find the latch in two pieces (see photo).

I found the same mechanism at the ReUse Store in south east Minneapolis. The inside was a bit rusty so I decided to use the part that I needed to replace in the house's door mechanism. I put it all back together and it works great.


Having installed a new deadbolt on the garage door and the backdoor and matching the keys, I wanted the front door to join in the fun so bought a new deadbolt with a changeable key system. I figured it would not be a simple swap with the existing deadbolt....and it wasn't.

The opening on the inside of the door was not quite big enough so I had to enlarge that. And the new bolt was longer and operated differently than the existing bolt so I had to bore out the opening for more room.


All the tools it took for the door mechanism, deadbolt and door latch.
While I was at it, I decided I really wanted the front door to latch. I cannot remember when or if it ever did. This was so much more work than it should have been. I don't understand how the latch could be so far off from the catch but it was almost 1/2 inch difference.

It took a crazy number of tools to get all three projects done. A short list: screw driver(s), WD40, rubber gloves, paper towels, drill, 1/2 drill bit, vacuum, utility knife, tape, scissors, head lamp, stapler, chisel.

Wednesday, October 11, 2017

Door Number 4

The fourth home improvement project involving a door. This one is my backdoor from kitchen to the back yard.

This is another project that has been long in the making. I bought the replacement door many years ago. I wanted a panel door that matched the style of the house and a larger window to let more natural light in the kitchen.

The photo to the left is the final stained and polyurethaned door from the kitchen side.

The staining came out kind of blotchy and removing all the old layers of paint kind of beat up the door. But overall I am very happy with the end results.
Here is the previous door with the hardware removed. This door would not have been original to the house.
The replacement door with some of the layers of paint removed. The door was painted on both sides. Also it was hinged to open in a different direction than needed.

I succeeded in switching the hinges and the door knob mechanism.
You can see a hint of all the paint layers. There was a pink, a green, a white and a beige paint. I used the heat gun technique to remove most of the paint.

Monday, September 25, 2017

Refreshing the floors

What you are seeing in the photo is the dining room floor where the left side has been treated with lemon oil and the right side has not.

My hardwood floors are not finished with polyurethane. I used to clean and wax the floors with Bruce's Floor Cleaner and Wax at least once a year. That was a long time ago.

The floors were getting desperately dirty so I mopped with one of the those wet clean mopping systems. I know you aren't supposed to use wet mops on wood floors but those disposable system mop heads have very little liquid so work well to get the dirt without saturating the wood. It picked up the dirt but left the floors dried and with various stains and rings.

I used a dry floor sweeping mop to apply a lemon oil product to the hardwood. The lemon oil takes care of many of the rings and some of the stains.

The floor definitely looks darker but also looks more consistent and refreshed. Apparently the lemon oil will only refresh the floors for a few days. We'll see.

Update: It has been a couple of weeks and the floors still look great.

Saturday, August 19, 2017

Third door project

This one I'm a bit embarrassed by. The door from the kitchen to the basement was stripped in 2001 during the kitchen renovation. I never stained and polyurethaned it! Well now it is. The photo is after on the left and before on the right.
This was a comparatively quick project. The door was so dried out though that I had to do some repair to the veneer. I didn't want the door all that dark so I thought one coat of the stain I used on the front would do. It is actually darker with just one coat but it is fine and matches the other doors in the house.

The basement side of the door was never completely stripped. I liked the "shabby-sheek" effect actually so just sealed this side with a coat of polyurethane.


Finished and hung.

Basement side with spice racks on. 


Thursday, July 20, 2017

New garage door

New door
I have gone several years with a door to my garage that doesn't lock and doesn't even latch. I have never had anything stolen but there have been so many posts on the NextDoor website where people have had their garages and cars broken into that I thought it was time to replace the door.

It wasn't just the door but the jam was also messed up. I found a complete exterior door at the Habitat For Humanity's ReStoreIt store. It was the correct size and opened the correct way. It only cost $45!

The locking door knob and dead bolt cost more than the door. The project came together without too much hassle ... which is a miracle at this place.
Old door

While I was working in the backyard, I repaired a couple of sections of the patio (not pictured) and replaced the pressure-treated wood mini-retaining wall with railroad ties that I found for free on the NextDoor website.

Sunday, February 5, 2017

One of the most successful DIYs yet

I have envisioned a chalkboard menu board for Juiced Nutrition Uptown using rollerblades for months. I finally got it all pit together today. Have to thank JT and Linda for the rollerblades and Andrew and his dad, Tom, for welding the brackets.

I was able to do some assembly at home and the installation went smoothly (this time around). The first attempt did not go well honestly.


Friday, May 27, 2016

Juiced Nutrition projects

Making benches out of wooden pallets. Thanks to JT for finding two good pallets. I found photos of different examples on Pinterest. None provided instructions. I based mine on a series of photos that used two pallets.

I sawed the pallets on half slat-wise. Stack three halves to form the seat. Used the 'best' half for the seat. I'm still trying to decide about the back. I think I prefer a lower back (the fourth half). It allows more attachment points.

I think I will lightly sand the seat and back so your clothes or skin don't get scratched.

My old wooden-handled hammer lost the battle with the pallet. These things are really put together. You can see the broken handle in the bottom image.


I'm also working on two chalkboard menu signs. I'm using chalkboard paint for the first time. I plan to use pallet slats form the border.